Introduction :-
Arduino Uno is a popular and versatile microcontroller board widely used in the world of electronics and robotics. One of its essential features is Pulse Width Modulation (PWM). PWM allows users to control the intensity of electrical signals, enabling precise control over various components like LEDs, motors, and servos. In this blog, we will delve into the exciting world of Arduino Uno PWM and explore its applications in creating interactive projects.
Understanding PWM
Pulse Width Modulation is a technique where the duty cycle of a digital signal is altered to simulate an analog voltage level. The output voltage is essentially the average value of the signal's on-off cycles. By varying the duty cycle, you can effectively control the amount of power delivered to connected devices, which helps regulate speed, brightness, or position in different applications.
In Arduino Uno, there are six PWM-enabled pins, marked as 'PWM,' which are digital pins 3, 5, 6, 9, 10, and 11. These pins allow us to generate PWM signals with various duty cycles using the `analogWrite()` function.
Applications of PWM with Arduino Uno:-
1. Controlling LED Brightness: PWM is an excellent tool for controlling the brightness of LEDs. By adjusting the duty cycle, you can make an LED glow with varying intensity. This feature is extensively used in mood lighting, displays, and smart home projects.
2. Motor Speed Control: PWM can efficiently regulate the speed of DC motors. By providing variable duty cycles to the motor, you can control its rotational speed. This capability is crucial in robotics and automation projects.
3. Servo Motor Positioning: Servo motors are essential for moving mechanical parts accurately to a specific position. PWM signals help in determining the angle to which the servo should rotate. It is widely used in robotics, RC cars, and animatronics.
4. Audio Generation: Although PWM is not primarily designed for audio applications, creative minds have found ways to use it for generating audio tones. With precise timing and control, you can create simple melodies or sound effects.
5. Temperature Control: PWM can be utilized for controlling the heating element in devices like ovens and soldering irons. By regulating the duty cycle, you can manage the temperature and maintain consistency.
Basic Syntax for Arduino Uno PWM
To generate PWM signals on Arduino Uno, you need to use the `analogWrite()` function. The syntax is straightforward :
PWM_PIN : The digital pin that supports PWM. (e.g., 3, 5, 6, 9, 10, or 11)
DUTY_CYCLE : An integer value between 0 (off) and 255 (full on). The value determines the percentage of time the PWM signal is high.
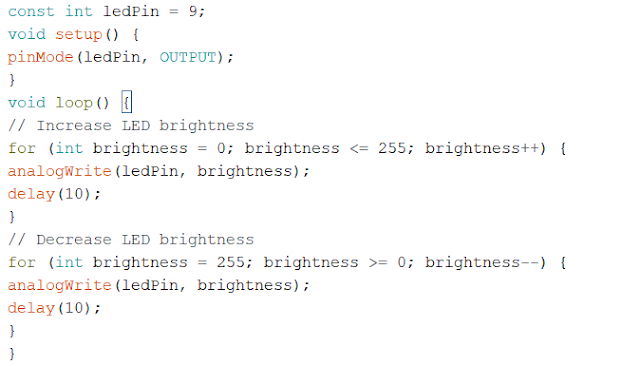
Example: Dimming an LED
Let's look at a simple example of using PWM to control the brightness of an LED connected to pin 9:
Conclusion :-
Pulse Width Modulation is a powerful feature of Arduino Uno that allows for precise control over various electronic components. From controlling LED brightness to precise motor positioning, PWM opens up endless possibilities for creating interactive and engaging projects. Understanding and harnessing PWM will undoubtedly elevate your Arduino projects to the next level. So, unleash your creativity and dive into the fascinating world of Arduino Uno PWM!.


