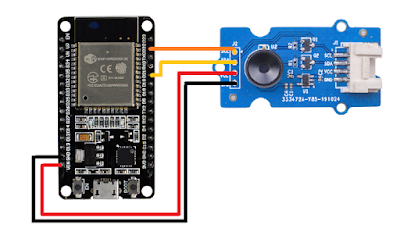
Thermal imaging technology has seen a surge in popularity due to its wide range of applications, from industrial monitoring to home automation. In this project, we'll explore how to create a web-based thermal imaging server using the ESP32 microcontroller and the MLX90640 thermal camera.
Hardware Components :
1. ESP32 microcontroller
2. MLX90640 thermal camera
3. MicroOLED display (optional)
Software Components :
1. Arduino IDE
2. ESP32 libraries (WiFi, WebSockets, etc.)
3. MLX90640 library
Project Overview :
1. Setup WiFi Connection : Connect the ESP32 to a WiFi network to enable communication with client devices.
2. Initialize Web Server : Use the ESP32 as a web server to serve a web page to clients.
3. Capture Thermal Data : Use the MLX90640 thermal camera to capture thermal data.
4. Compress and Send Data : Compress the thermal data and send it to clients connected via WebSocket.
5. Display Data : Optionally, display the thermal data on a MicroOLED display for local viewing.
Key Features :
1. Real-time thermal imaging : Capture and stream thermal data to clients for real-time monitoring.
2. Web-based interface : Access the thermal imaging server from any device with a web browser.
3. Compact and portable : The ESP32's small form factor makes it suitable for portable applications.
Future Improvements :
1. Implement data logging : Save thermal data to a file for analysis or long-term storage.
2. Add image processing features : Apply filters or algorithms to enhance the thermal images. Sure, let's break down the code step by step:
1. Header includes :
C++
#include <WiFi.h>
#include <ESPmDNS.h>
#include <Wire.h>
#include <SFE_MicroOLED.h>
#include <WebSocketsServer.h>
#include "MLX90640_API.h"
#include "MLX90640_I2C_Driver.h"
Here, you're including necessary libraries for WiFi communication, mDNS (for network discovery), I2C communication, OLED display (commented out), WebSocket communication, and the MLX90640 sensor API.
2. Global variables and constants :
C++
const char* ssid = "admin";
const char* password = "admin@123";
WiFiServer server(80);
WebSocketsServer webSocket = WebSocketsServer(81);
#define TA_SHIFT -64;
static float mlx90640To[768];
char positive[27] = "ABCDEFGHIJKLMNOPQRSTUVWXYZ";
char negative[27] = "abcdefghijklmnopqrstuvwxyz";
TaskHandle_t TaskA;
xQueueHandle xQueue;
int total = 0;
Here, you define WiFi credentials, server instance, WebSocket server instance, constants related to MLX90640 sensor, arrays for data compression, task handle, queue handle, and a counter.
3. Setup function :
C++
void setup() {
// WiFi connection
// mDNS setup
// Server setup
// WebSocket setup
// Task creation
}
In the `setup()` function, you connect to WiFi, set up mDNS for network discovery, start the server, initialize WebSocket, and create tasks.
4. Task1 function :
C++
void Task1(void* parameter) {
// Initialize I2C communication
// MLX90640 sensor initialization
// Loop for capturing thermal image
// Send data to the queue
// Delay for frame rate control
}
This task captures thermal images from the MLX90640 sensor, calculates temperature readings, and sends data to the queue.
5. receiveTask function :
C++
void receiveTask(void* parameter) {
// Receive data from the queue
// Compress and send data over WebSocket
}
This task retrieves data from the queue, compresses it, and sends it over WebSocket.
6. webSocketEvent function :
C++
void webSocketEvent(uint8_t num, WStype_t type, uint8_t* payload, size_t length) {
// WebSocket event handling
}
This function handles WebSocket events such as connection, disconnection, and incoming messages.
7. compressAndSend function :
C++
void compressAndSend() {
// Compress data and send it over WebSocket
}
This function compresses thermal image data and sends it over WebSocket.
8. Main loop function :
C++
void loop() {
// Handle incoming HTTP requests
// Serve a webpage with WebSocket connection
}
In the `loop()` function, you handle incoming HTTP requests, serving a webpage with WebSocket connection for displaying thermal image data. Overall, the code sets up a server on the ESP32, captures thermal images from the MLX90640 sensor, compresses the data, and sends it to clients connected via WebSocket for real-time display.
Output :
Conclusion :
Building a thermal imaging web server with the ESP32 and MLX90640 opens up a world of possibilities for monitoring temperature-sensitive environments. Whether you're a hobbyist or a professional, this project demonstrates the power and versatility of the ESP32 microcontroller in IoT applications.

